Table of Contents
Introduction to the PF Tek / BRF Cake Guide
The PF Tek Guide / Brown Rice Flour (BRF) Cake Guide was created by Robert McPherson and has had many changes and improvements. We do not take credit for developing this method.
The PF Tek Method represents a DIY grow method. In this method, you do not purchase premade products and create everything yourself. If you’d like to go with a more straightforward method as an introduction to Mushroom growing, then choose our mushroom spawn bag guide here.
The PF Tek is recommended for first-time growers for the following reasons:
- To learn the life cycle of the Mushroom of your choice.
If you do not know the life cycle, growing a batch of cakes to start is in your best interest. Once you understand what mushrooms need to grow as far as moisture, misting, fanning, lighting, etc., it will be much easier to take care of more significant projects. - To learn the basics of sterile procedures.
Sterile conditions are critical in many aspects of cultivating mushrooms. BRF Cakes are a jumping point for conditions where stakes are higher. - To keep costs low.
Making BRF cakes is a beginner’s cheapest, most accessible method of growing mushrooms.
Timeline of the BRF Tek Mushroom Growing Method
Inoculation until first signs of growth – 7-14 days
The first sign of growth to full colonization – 3-4 weeks
Full Colonization > Consolidate for 1 week
From Consolidation until harvest – 1-2 weeks
Note: Easily shop for mushroom growing supplies in our shop.
Part 1 – Preparation
All Materials Required for PF Tek / BRF Cake Guide:
1/2 Pint WIDE MOUTH Canning Jars (Amazon Link)
- Can I use 1/2 pint jars that are not wide mouth?
You can, but getting the PF Tek / BRF Cake out of the jar after colonization will be a HUGE pain. We use wide-mouth jars to remove our cakes after the colonization period efficiently.
- Can I use pint jars?
You should not. Pint jars take much longer to colonize and are prone to stalling out and contamination.
- Can I use 1/4 pint jars?
1/4 pint jars can be used, but remember, the smaller amount of substrate = less yield per cake.
Vermiculite (Amazon Link)
- Can I use a substitute for Vermiculite, perlite, or other materials?
No, because Vermiculite is a mineral sponge, it can soak up and hold large amounts of water. Perlite, on the other hand, is crystalline and does not absorb moisture. Instead, the water sits on the outside surface of the perlite and evaporates off.
If you plan to grow a wood-loving edible using BRF cakes, such as Shiitake, Lions Mane, Nameko, Reishi, etc., you can substitute Vermiculite for sawdust. Do everything the same but use sawdust instead of Vermiculite.
Brown Rice Flour (Amazon Link)
Brown rice flour is the nutrition your mycelium will digest and “eat” in the PF Tek BRF Cake guide. You can use organic brown rice flour, regular brown rice flour, or even get long grain brown rice and grind it yourself with a coffee mill or food processor.
Hammer/Nail
You will use the nail to make four small holes in the metal jar lid so you can inoculate (inject) your substrate. You do not want to make a large hole in your jar lids, just big enough for the needle on your spore syringe.
Tinfoil
The tinfoil will cover the tops of your jars before steaming/pressure cooking to keep any drips from the lid from entering the jar and messing with the moisture content.
Mixing Bowl and Spoon
Preparing your Materials for PF Tek / BRF Cake Guide
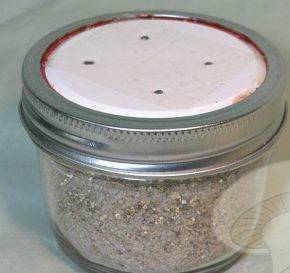
- Take your lids and begin by using your hammer and nail to place four holes near the rim of your lid, evenly spaced out, as shown above.
For this ratio, we will make five mushroom jars which is a good number for those completing this guide for the first time.
Put 2 cups of Vermiculite in your mixing bowl and add one cup of water. Mix well and make sure that the Vermiculite has absorbed all the water. Your Vermiculite at this point should feel moist to the touch, and when squeezed, only a few drops should come out of your mix. If your mixture is too wet, you will have problems later.
- Next, you will be mixing up your substrate material. The ratio is as follows:
-2 Parts Vermiculite
-1 Part Water
-1 Part Brown Rice Flour - Next, mix your brown rice flour, and mix well. You are trying to coat the moist Vermiculite in the brown rice flour.
- Once you have a consistent mix, load your jars. Equally, distribute your substrate into your 5 PF jars. Make sure to leave the mix airy and not compressed. You will want to leave 1/2 inch at the top of your jars for your dry Vermiculite contamination barrier.
- Next, take a paper towel and wipe the 1/2 space you left at the top clean from any moisture or material. Then take some dry vermiculite and pour it into your left space. You do not want to pack it down but make sure you have enough to fill the space without leaving any air pockets. See the image here:

Place your metal jar lid with the holes and screw your metal ring piece onto the jar. Cover your jars in 1-2 layers of tin foil to protect your jar from condensation drips.
Part 2 – Sterilization
Required Materials for Part 2 – Sterilization of the PF Tek / BRF Cake Guide
Pot With A Tight Fitting Lid or Pressure Cooker (Amazon Link)
It is recommended to use a pot with a tight lid will be used to steam sterilize your substrate. Make SURE you have a tight-fitting lid as you want to keep as much steam as possible inside your pot to sterilize your jars. If you are using a pressure cooker, read the instructions and safety information.
Jar Rings/tinfoil
You will use these to line the bottom of your pot (If steam sterilizing) along with a layer of tinfoil to keep your jars out of direct contact with the water. It is the steam that does the sterilization. If you leave your jars in the water, the water could boil up and enter your jars. This will reduce moisture content and could lead to bacterial contamination and other failures.
Substrate Jars (Amazon Link)
Preparation for Part 2 – Sterilization of the PF Tek / BRF Cake Guide
Option 1: Steaming
- Line the bottom of your pot with spare jar rings as shown.
- Add water to the top of your layer of jar rings. You want 1-2 inches of water.
- Place your layer of folded tinfoil on top of the layer of jar rings.
- Next, place your substrate jars onto the tinfoil and ensure they are not in direct contact with the water; as stated before, the steam will do the sterilization.
- Place your TIGHT-fitting lid on and turn your burner high. Once the water starts boiling, turn the burner down to a simmer and start your 90-120 minute timer. We prefer 120 minutes personally as it gives me a higher success rate.
- If you are not using a tight-fitting lid, a lot of steam will escape, and your pot will tend to boil dry and warp the bottom of your pot, ruining it.
- After the time is up, leave the lid on, remove it from heat and let cool overnight.
Option 2: Pressure Cooking
- Place your trivet or metal rack into the bottom of your PC and fill with 1-1.5 inches of water.
- Place your jars on the metal rack above the water line.
- Follow your pressure cookers instructions to bring it up to pressure (15PSI) and let cook for 60 minutes.
- After your pressure cooker cycle has finished, turn off your burner and allow it to cool overnight.
Warning: Don’t try to work with your sterilized jars freshly after sterilization. They will be boiling, and this is a dangerous part to rush.
Part 3 – Inoculation (Spore Injection)
Required Materials for Part 3 – Inoculation of the PF Tek / BRF Cake Guide
70% Isopropyl Alcohol (Amazon Link)
It is used to wipe down instruments, materials, latex gloves, etc.
Latex Gloves (Amazon Link)
Your hands are covered in all kinds of nasty contaminants even shortly after washing them. Latex gloves that are wiped down with ISO alcohol are the best way to clean your hands so they will not contaminate.
Surgical Mask
Make sure your mask is the style that surgeons and dentists wear; these stop the bacteria in your mouth from being breathed all over your work.
Lighter
Use a small propane torch for flame sterilizing needles and other instruments, although a butane torch or BIC lighter will work just as well.
Still Air Box (Amazon Link)
You could get away with doing open air inoculations, but using a still air box will increase your success rate and keep a contaminate-free work area to work. Some people cut arm holes in totes, some flip a tote upside down over the edge of a table to get their hands inside, and some even use a cardboard box. Do not forget that an enclosed area + iso alcohol fumes + flame = Hazard!
The idea behind a glovebox is to create a workspace where air currents are still. You would load your sanitized items into your glove box and then spray the air with plain water or a 10% bleach solution. Close the lid and let settle for 3-5 minutes which will trap all the contaminates in the water, and take them to the bottom of your glove box, leaving you with an aseptic workspace. Be sure to turn off any device or equipment that will cause a draft or air movement in your room before starting your work (IE Fan, A/C, etc.).
Spore Syringe
Many vendors offer different edible and medicinal mushroom spores to start your research. Psilocybe Cubensis spores are legal to own, obtain and research under a microscope, but the second you intend to grow them, they are illegal in most places. Only grow active species if it is legal in your country. For the sake of this article, we will assume it is legal to grow Psilocybe Cubensis where you live.
When you receive your syringe, some vendors will have the syringe and needle separate. Before you get all gung-ho and attach the needle to the open air, do not forget that open air contains hundreds of thousands of mold spores and bacteria, which would contaminate your syringe. Use your glove box to remove the cap on the syringe and then attach the needle for best results. Work fast and clean to ensure you do not contaminate your syringe.
Note: Make sure you purchase your syringes from a trusted vendor. Many sites out on the internet are known for scamming, sending contaminated syringes, or syringes filled with nothing but water. Before purchasing anything, google the company’s name, look for reviews, and research to see if they offer a good product.
Preparation for Part 3 – Inoculation of the PF Tek / BRF Cake Guide
Using a Glove Box
- Take your jars out of your pot or pressure cooker and assemble them in your work area. Then remove the foil from the jars and wipe down the top and sides of the jar with a paper towel soaked in ISO alc. Place the jars in your glove box, and put on your latex gloves and surgical mask.
- Spray your water or bleach solution into the box before sealing it. You should have two openings in the front for your hands (wearing gloves wipe with alc, of course). Outside your box shake your syringe to distribute the spores evenly, and then flame sterilizes your needle until it is RED hot. Next, wash your gloves with some ISO alcohol and then enter the glove box with your needle in hand.
- Place the needle into the hole in your substrate jar at an angle, so the tip of the needle is up against the glass. Then GENTLY inject 1/4th of a CC into the jar. Remove the needle and repeat for the other three holes. You should use 1CC per jar or 1/4th of a CC per hole. Set that jar aside in your box.
- Remove your hands and the syringe from the box, flame sterilizes your needle again, and repeat as needed. You need to flame sterilize your needle between jars. One 12CC syringe should be able to make 12 1/2 pint BRF cakes. Do not place the foil back on your jars.
Inoculating in Open Air
Inoculating in the open air is more accessible than using a glove box but will increase the risk of introducing contamination into your jars.
- Take your jars out of your pot or pressure cooker and assemble them in your work area. Remove the foil lids and then wipe down the tops and sides of the jars with a paper towel soaked in ISO alc.
- Shake your spore syringe to distribute the spore solution inside, and then flame sterilizes the needle.
- Place the needle into the hole in your substrate jar at an angle, so the tip of the needle is up against the glass. Then GENTLY inject 1/4th of a CC into the jar. Remove the needle and repeat for the other three holes. You should use 1CC per jar or 1/4th of a CC per hole. Set that jar aside in your box.
After inoculating, set that jar aside, flame sterilizes your needle again, and repeat as needed. You need to flame sterilize your needle between jars. Do not place the foil back on your jars.
Flame Sterilizing Option
Materials:
Butane Torch
Alcohol Lamp
BIC Lighter
All three are viable options; everyone has their preference.
You can also use regular butane lighters that leave soot after flame sterilizing. This is personal preference, and the soot will not ruin anything.
Part 4 – Colonization of the PF Tek / BRF Cake Guide
After inoculation, you will want to place your jars on a shelf and leave them alone. Most new people want to move and check their babies every few hours, which should be avoided. Your dry vermiculite barrier acts as a filter, and the more you move and disturb your cakes, the bigger chance you will shift your vermiculite barrier and let contaminates into your cake.
Recommended Room Temperature
Room temperature is acceptable for colonization (70-75F, If you are comfortable, your cakes will be too). You DO NOT need any fancy incubators or the like. Cakes will colonize fine at temperatures even lower than room temperature (60-70F) but progress slowly. If you are worried about keeping your temperature around 70-75F, use a small space heater to do the job. Old, outdated information has circulated the internet about the ideal temperature for cube growth being 86F; this is flat-out untrue and obsolete. Temperatures above 80F can promote bacteria and mold growth and germinate nasty contaminates that may not have germinated had the temperatures been kept a bit lower. You do not need to keep your jars in complete darkness; place them on a shelf and leave them be; ambient light is delicate.
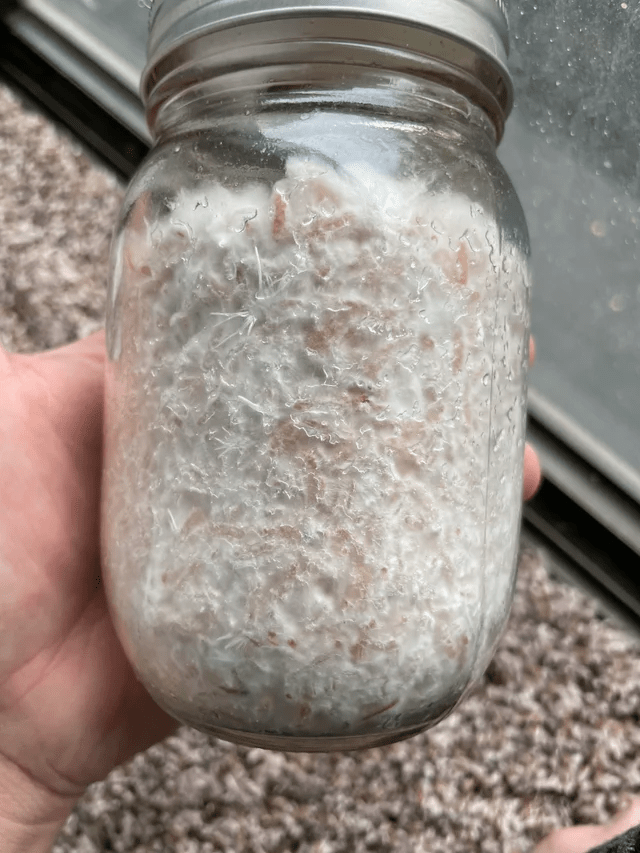
Spore germination should take place in 7-14 days; time varies. Patience is key at this point; you are better off forgetting about your jars for at least ten days before checking them all individually.
Contamination Warning
Look out for any colored molds (Red, purple, green, blue, or orange) that are a sign that your sterile procedure was not up to par, and these cakes should be disposed of carefully. Some people reuse contaminated PF jars. We do not recommend it, but if you must, pressure cook or boil the jars for an hour to kill off whatever contamination you have grown. Then take the jar outside and dump it before bleaching the jar, lid, and ring. Do not open a contaminated jar indoors for any reason while doing the PF Tek / BRF Cake guide.
Another common contamination of PF cakes is bacterial contamination. If your jars in your room begin to smell funky (Like rotten fruit, socks, feet, eggs, sour smell, etc.), dispose of the jar.
Contamination can be due to a few different factors:
Poor sterilization practices – Did you steam to sterilize your jars for the required time in a pot with a tight-fitting lid? You will encounter contamination problems if you use a lid with a poor fit or no lid.
Sterile procedure while inoculating – Did you follow the proper technique while inoculating? Did you use a glove box, wipe everything down with ISO alc, and flame sterilize your needle before each jar?
Spore or LC Syringe – If all your jars have the same contamination at the place you injected your spores, chances are that you have received or made a contaminated syringe.
Germination
Once your spores have germinated and clean, healthy white mycelium is growing on your cakes; it will take 1-4 weeks to colonize them fully. Once your entire cake has been colonized, you must leave the cake inside the jar for another seven days for the consolidation period. The process is followed to give the mycelium time to digest the nutrition of the cake and get a better hold of the substrate. After 100% colonization and seven days of Consolidation, you are ready to place your cakes into fruiting!
Part 5 – Fruiting of the PF Tek / BRF Cake Guide
Materials you will need for part 5: Fruiting the PF Tek / BRF Cake Guide.
Clear plastic tote with lid
This will be used to make your Shot Gun Fruiting Chamber. The bigger sizes will not only hold more cakes but will also perform better. 50-115L totes are ideal, built according to the number of cakes you are fruiting.
1/4″ Drill bit and Drill
This will be used to make holes in your clear plastic tote on all six sides, roughly 2 inches apart.
Perlite
Perlite will be moistened, drained out, and then layered 4-5 inches deep in your shotgun fruiting chamber to provide a high humidity environment for your cakes. The water sits on the perlite’s surface and slowly evaporates into the air.
Strainer
You will need this to strain excess water out of your perlite. You want the perlite to be wet but not saturated in water; there should never be any standing water inside your chamber.
Large bowl
You will use this large bowl to dunk your cakes after birthing.
Vermiculite
You will then roll your cake in Vermiculite after the dunk. This procedure is known as the dunk and roll. The moistened Vermiculite will act as a reservoir; it will retain water when misted and provide plenty of water for your cake.
6500K Compact Florescent Light (Amazon Link) (Optional)
6500K is the ideal spectrum of light for the growth of Psilocybe cubensis and many different edible and medicinal mushrooms. These bulbs can also be labeled as “Daylight bulbs.” You can also put your chamber in place to receive a few hours of indirect sunlight daily.
4 Empty 1/2 Pint Substrate Jars
These will be placed under your chamber to elevate it off the table/surface and allow air to flow underneath your chamber.
Spray bottle with mist setting
This will be used to mist your cakes and chamber during the fruiting stage.
Procedure for Part 5 – Fruiting of the PF Tek / BRF Cake Guide
Building your Shot Gun Fruiting Chamber
- Take your clear plastic tote, 1/4 ” drill bit, and Drill, and begin to drill holes roughly 2 inches apart on all six sides of your tote. Be careful not to push too hard on the plastic tote with the drill bit, or you may crack the plastic. This part will take a bit of time but be sure to drill all six sides and then wipe out any plastic burs or debris.
- Next, pour some perlite into your strainer and quickly run cold tap water over it. Try not to inhale the dust from the perlite; it can be harmful to your lungs. To avoid excessive dust, you can pour water into the bag of perlite before pouring, significantly reducing the dust.
- Once the perlite is soaked with water, give your strainer a few good shakes and let all the excess water drain away. Stop shaking when no more water drips from the strainer.
- Dump the now moistened perlite into your tote until you have a 4-5″ layer of moistened perlite inside your chamber.
- Place your chamber where you plan on fruiting (In an open room is ideal) and raise it above the surface it is resting on with four empty 1/2 pint stubby jars allowing air to flow under the chamber up through the holes into the perlite. This will help the moisture evaporate off the surface of the perlite and create high relative humidity in your chamber.
NOTE: If your tote is flimsy or you are cracking the plastic each time you drill, try setting it on its side and drilling from the
inside out with a piece of wood under the tote. This will help to prevent cracking.
Note about hygrometers:
Most hygrometers (digital especially) are cheap, poorly made, and inaccurate. We have left a hygrometer in the materials and supplies list because if you build your chamber correctly, you will have 90%-99% RH when loaded with cakes. Suppose you can find an analog meter with a calibration screw, the only accurate method of measuring relative humidity. Take your analog meter and wrap it in a moistened towel for an hour. After the hour, adjust the calibration/set screw, so the front reads 100%. Your hygrometer is now calibrated and should be accurate. Do not be afraid to recalibrate it every few weeks or every month.
Also, note that condensation on the side walls of your chamber is not an indication of relative humidity. This indicates a temperature differential between the inside of the chamber and the ambient room air. This causes moisture inside the chamber to condense on the walls of the chamber. If you build your chamber correctly, your relative humidity will be in the needed range.
Note about fruiting temperatures:
65-75F will work fine. The cooler your environment is for fruiting, the slower your mushrooms will grow. While they will grow slower, they will also tend to be meatier and have thicker stems. Some people swear by fruiting in cooler temperatures; others say room temperature is acceptable. Go by the assumption that if you are comfortable, your mushrooms are also likely. As you grow more, you can experiment with temperatures for yourself.
Part 6 – Birthing Your Cakes / Dunk & Roll
You can start birthing your cakes once the chamber is built. Take your cakes that have been 100% colonized and consolidated for seven days to a clean countertop and follow the step below:
- Unscrew the jar lid and dump out the vermiculite barrier into the garbage. This has acted as a filter and will now hold any contaminates that tried to make their way into your jars. After removing the vermiculite layer, firmly smack your jar onto a cutting board, piece of wood, or countertop to remove the cake from the jar.
- Next, take your cakes and remove any remaining vermiculite left over from the barrier under tap water.
- Fill your large bowl or pot with water, and then place your freshly washed cakes into the container. Place a plate or glass bowl on top of the cakes to weigh them and keep them fully submerged. You will want to keep your cakes dunked for 14-24 hours. This is to replenish the water in your cakes so you will have a tremendous first flush. Leaving them out at room temperature during this should be fine.
- After the dunk, remove your cakes from the bowl/container and place them in a clean area. In another bowl, prepare some dry vermiculite. This is the roll part of the dunk and roll. You will then take your cakes individually and roll them in the dry Vermiculite. The Vermiculite will act as a moisture reservoir and allow your misting to replenish the water supply to the cake. Roll the cake around till it is good and covered.
- Place your cakes into your SGFC on top of squares of tinfoil (So the cakes do not rest on the perlite) or a plastic lid. Once your chamber is loaded, you can gently mist the cakes to moisten the dry Vermiculite covering. Once the vermiculite covering has been moistened, you can gently fan the chamber with the lid and then place the lid back on.
Note: After the first flush, you will need to dunk your cakes again to replenish the water content of the cake and initiate the second flush. You do not need to roll in Vermiculite again after this dunk. If you roll again, you will cover the outside of the cake (covered in contaminates from the open air) with a moist layer of Vermiculite. This will promote the growth of molds and bacteria and will ultimately result in your cakes contaminating. Dunk and roll for the first flush, and then only dunk for the second and third flush.
Growth Triggers – PF Tek BRF Cake Guide
Here are some of the triggers that are needed to initiate mushroom pinning (growing):
Fresh Air
The holes in your chamber, in combination with fanning, will provide your cakes with plenty of fresh air. This is a significant pinning trigger.
Evaporation from the substrate
Misting allows your cakes to absorb moisture into their vermiculite reservoir and replenishes the perlite moisture. After you mist, the water will begin to evaporate off the surface of your cakes; this is a VERY important pinning trigger. If your cakes are constantly waterlogged and soaked/drenched with water, they will not grow, perform poorly, or contaminate.
Light
Be it from a 6500K compact florescent or indirect sunlight, ensure you have some form of suitable light for your chamber. You should have the light on a cycle of 12/12. You do not need the light to be directed against the chamber, but pointing at it a few feet away should do the trick. Proper lighting will help initiate a solid pin set and firm, meaty mushrooms. IMO lighting is on the bottom of the list of pinning triggers, but something not to be ignored if you want a good harvest of beautiful fruits.
Relative Humidity
Providing the proper range of RH for the species of Mushrooms you are cultivating will help form your fruiting bodies. A Shot Gun Fruiting Chamber is designed, if built correctly, to hold an RH of 95-100% when filled with cakes, which will be perfect for cubensis and most other edible and medicinal mushrooms.
Temperature
The species of Mushrooms being cultivated MUST fall within a specific temperature range, or it won’t fruit, or worse, it gets infected. Too cold, won’t fruit amongst other problems, mainly dehydration. Too hot, the environment swelters, and substrates retain moisture. Infections prefer warmer temperatures and stagnant air.
Fanning and Misting
Fanning and misting is a daily ritual in the PF Tek BRF Cake guide that you will need to provide your cakes with the needed moisture and fresh air exchange to promote optimal growth. You will have to plug in your variables and environmental conditions to find a routine that works for you, but here is a basic overview:
Misting should be done 2-3 times per day. We recommend misting in the morning, in the afternoon, and then once more before bed. You want to set your spray bottle to the delicate mist setting and directly mist the cakes. Do not saturate them, but allow a good portion of the mist to settle onto the cakes. Also, misting helps replenish moisture to the perlite and keeps up relative humidity. After each time you mist, you should be fanning your chamber with the chamber’s lid, a book, or a magazine. We like to fan for 15-30 seconds; this will start the process of evaporation of your cakes, which is a significant pinning trigger.
Note:
If you work long hours, your chamber will be fine if left 10-14 hours without misting or fanning. Just be sure to give them a good mist and fan before work, and then once again after you return. This will not affect your mushrooms negatively. If you are around to give your mushrooms more attention, do so, but do not worry about leaving the chamber for 10-14 hours.
Fan every time after you mist, along with a few more times throughout the day. While we only mist 2-3 times daily, we tend to fan somewhere 5-6 times per day. This allows fresh air exchange and will keep your fruits very happy. There is such a thing as fanning too much.
Stages of growth
As you introduce your cakes to the many essential pinning triggers, knots will begin to form. These appear as little white bumps (1-2mm) and will soon develop into primordia. Primordia (baby mushrooms) will then develop into pins, and these pins will eventually develop into the mature fruit body.
Pins will then grow and mature into the mushroom fruit body.
Harvesting
With the PF Tek BRF Cake guide, there are two times that you could harvest your fruits. If you are going for max potency, you should harvest after the veil breaks and before the Mushroom begins to sporulate. However, if you are going after your spore prints, you should allow the veil to break and harvest at the first sign of spores being deposited on the Mushroom stipe.
If mushrooms have blackheads and have stopped growing, they’re aborts. Pick them off when you pick the rest of the flush. It’s a myth that will rot and ruin a substrate. It’s normal for some to abort, especially when you have a lot of mushrooms on a substrate. A substrate can only support so much fruit; if you get a good pinset, expect some of them to abort.
As far as harvesting your fruits goes, you can either twist and pull the Mushroom from the cake gently or use some scissors to cut the Mushroom as close to the cake as possible. We prefer the twist and pull method.
Second Flush
After the first flush, you will need to dunk your cakes again for 18-24 hours to replenish the water in your cakes and allow more mushrooms to grow. It is a good idea to allow your cakes to dry out after the first flush for a few days before dunking for the second flush. After the dunk, remove the cakes, place them back into your chamber, and continue with your regular misting and fanning routine. Do not re-roll your cakes in verm as mentioned previously in this post.
Your cakes will easily flush 3-4 times before being spent. As the mycelium ages, it gets weaker and has difficulty fighting off contaminates. As you get into the 4th flush, it is not uncommon for your cakes to start growing contaminates, at which time you will want to dispose of them quickly and safely. You can do this by wetting the cakes down with your mister (to stop harmful spores from going air-borne) and placing the cakes in a trash bag before moving them outside.
Cleaning Your Chamber
After you have fruited your cakes out 3-4 flushes and you want to place another set of cakes into your chamber, it is always a good idea to clean things. You can do a few different things to reuse your perlite:
– Take perlite and place it into a big stock pot filled with water and boil for an hour. After the boil, wait for things to cool and then strain off your perlite, remove any excess water and set aside.
– Another method is to place the perlite into a large pot filled with a 10% bleach/water solution and let soak for 10 minutes. After the soak, places the perlite into a strainer and run water from the tap over it until you cannot smell the bleach anymore.
To clean your SGFC, we recommend wiping it down with a 10% bleach/water solution before replacing your clean perlite in the chamber.
Conclusion
We hope this guide sends you on your way to cultivating the edible or medicinal Mushroom of your choice. We recommend reading through this post a few times before assembling your needed materials. Take your time, make sure you understand each step along the way and DO NOT deviate from the guide. Improvisation and winging things will result in failure or poor results and performance. Once you have a few grows under your belt, you can start experimenting and trying different things.
Good luck, folks, and welcome to the ranks of those addicted to fungi!
Head back to our Mushroom Growing home page here: https://mushroomgrowing.org