
This guide will accurately show you how to use a mushroom spawn bag. The guide will provide some more advanced tips to help you best grow mushrooms using a grow bag with many types of mushroom strains and conditions.
Before we move forward, it’s safe to assume you have prepared your mushroom substrate and mushroom spore syringe. If you are new to these concepts, read our guide on mushroom growing at home for a more beginner-focused guide.

Introduction to the Mushroom Grow Bag
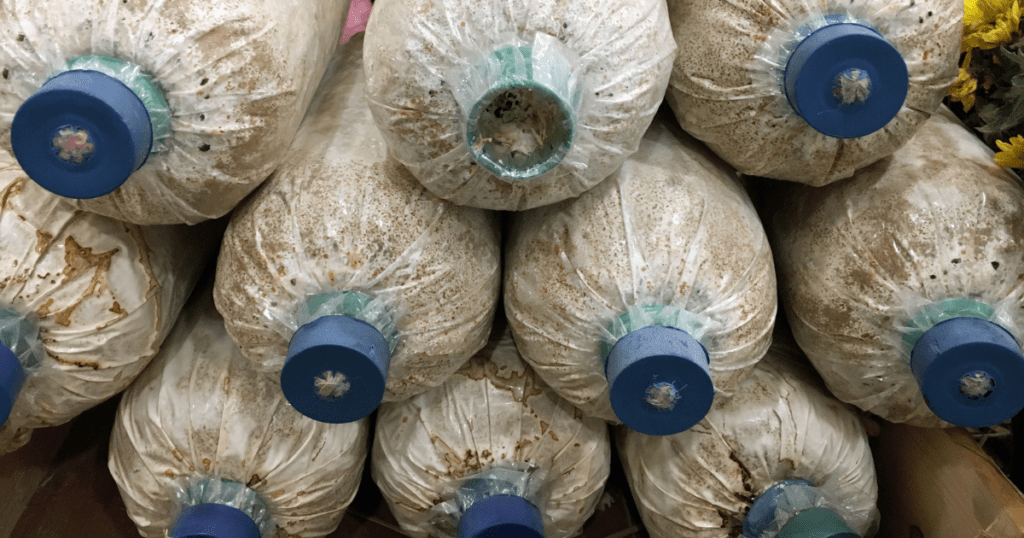
Components of the mushroom spawn bag
- Each bag has a self-healing injector site, which closes after you pull the needle out.
- The white square filter patch located towards the top of the bag allows proper gas exchange but will keep contaminates out.
Sterilization tips for mushroom spawn bags
- It is essential to ensure that all spore injecting activities are done in the cleanest environment possible.
- Sterilized conditions ensure mold does not form inside your growing substrate, which can ruin your work.
Required Supplies – Mushroom Grow Bags
→ Shop Mushroom Grow Bags with Injection Ports at Shroom Supply
Required Supplies – Mushroom Spore Syringes on Amazon
Search Mushroom Spore Syringes on Amazon
Part 1: Inoculating Mushroom Spawn Bag
1. Wipe the syringe needle and the injection site with an alcohol swab and let it dry
2. Pull the syringe needle cover off of the syringe.
3. Push the needle about 1/2 inch into the bag and inject about 1-2 cc’s of spores. Pull the needle halfway out, angle it in a different direction, and inject another 1-2 cc’s of spores. Use a total of 3-5 cc’s of spores per spawn bag.
4. Make sure you inject in multiple locations to help spread your spore solution.
5. Unroll the spawn bag and make sure the filter patch is upright. Slowly pull the two sides apart and be careful not to touch the white filter. The goal is to provide a channel or path from the grain to the filter.
Part 2: Colonization of the Mushroom Spawn Bag
1. Place your spawn bags in a warm, dark location (75-81 degrees) and leave to incubate. Unlike jars, Spawn bags colonize from the inside out, so you most likely won’t see any mycelium growth for 7-14 days.
(Optional) Between 14-17 days, you can break up the bags with your fingers to spread the mycelium. After spreading the white mycelium, gently re-pack the grain to its original shape. This step is optional as you must be careful not to break them up too much and destroy the mycelium network. We only suggest this step when you have very slow-growing bags. This method works best on the Rye bags.
Note: Check out our shop for more mushroom growing supplies.
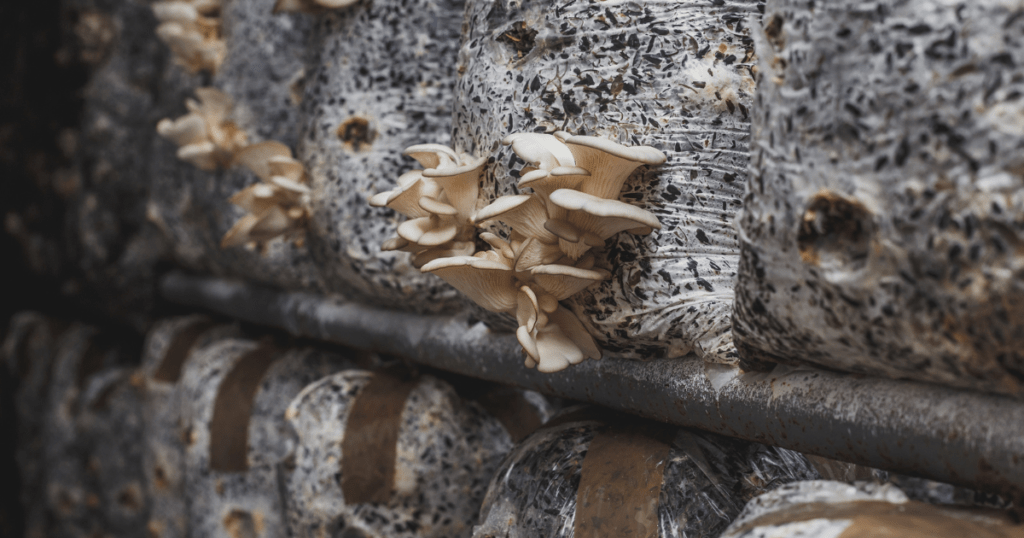
2. Complete colonization may take 30-45 days, depending on the species and the temperature you incubate. Unlike jars, the speed at that spawn bags germinate and colonize may have much more significant variance. The photo below is a spawn bag full of colonized and ready to move to the next step!
Part 3: Fruiting Your Spawn Bags
There are three different ways to fruit spawn bags. The most popular and recommended way is the bulk casing method: The yield is four to five times more than the other fruiting methods. Your second-best option for fruiting would be to use a fruiting chamber with perlite like you would substrate jars (See BRF Jars / PF Tek Guide here). The last option is to fruit directly in the bag.
Fruiting using the Bulk Casing Method
This method involves simply breaking up the fully colonized spawn bag into small pieces and mixing it with more mushroom growing substrate in a tub or container. The contents of the mushroom grow bag and new uncolonized substrate re-colonize and form one big fruiting cake.
In order to mix the contents of your spawn bag into more substrate, you will need more of the same substrate you have inside your spawn bag. This means you can buy another spawn bag of the same type, or you can buy a more bulk amount of the same material. This is easy to do if your substrate is a manure mix, straw, or sawdust.
It will take some time for the substrate from the spawn bag to recolonize the uncolonized substrate, about a week or two. But once it does, the fruiting result will be strong and worth it.
This method provides five times the surface area, resulting in a much larger yield. The bulk Casing Method has become the most popular method for first-time spawn bag growers.
Fruiting in a Humidity Chamber
- The second most popular way to fruit your spawn bags would be to use a container with dampened perlite (white volcanic rock).
- In this method, substrate jars are used. You will need vermiculite in this method to provide moisture to the cake and keep it hydrated.
- Start by removing the colonized grain from the bag. Dunking in water is not recommended with the spawn bags because they will not absorb water directly into the grain. Hence, the need for vermiculite.
- Place a piece of foil on top of the perlite. The foil should be about one inch larger than the cake on all sides.
- Place a 1cm layer of vermiculite on the foil. Use a spray bottle and moisten the vermiculite enough, so it’s saturated, but there should be no standing water.
- Place the spawn cake on the vermiculite and add another 1cm layer of vermiculite. Spray the top layer with water to dampen. You will need to keep the vermiculite damp by misting daily.
- It can take a few weeks for mushrooms to form. There are typically no set flushes for this growing style; the mushrooms will grow sporadically for the following weeks.
Note: Check out our shop for more mushroom growing supplies.
Fruiting in the Bag
The last method is fruiting directly in the bag. This method is the easiest but typically yields the least. You will need vermiculite for this method to keep the grains hydrated.
- Cut the top of the bag off. Cut above the white filter patch.
- Remove the spawn cake. Add a 1cm layer of vermiculite to the bottom of the bag, then use a spray bottle to moisten it enough, so it’s saturated, but you don’t want any standing water. Use spring or bottled water.
- Put the spawn cake back in the bag and add another 1cm layer of vermiculite on top of the spawn cake. Spray with water like you did the first layer.
- Fold the top of the bag over and use a binder or paper clip to keep it closed.
- Open the bag twice daily for a few minutes to allow fresh air to exchange. Mist the vermiculite as needed to ensure it stays hydrated.
- It can take a few weeks for mushrooms to form. There are typically no set flushes for this growing style; the mushrooms will grow sporadically for the following weeks.
Congratulations, you’ve completed the steps to use a mushroom grow spawn bag!
Visit our main page for more guides and tips!: https://mushroomgrowing.org.